Solargraphy Camera in a Can Tutorial
Discover how to capture the Sun’s journey across days – or even months! – with this easy DIY solargraphy camera in a can. A perfect blend of art, science, and creativity!
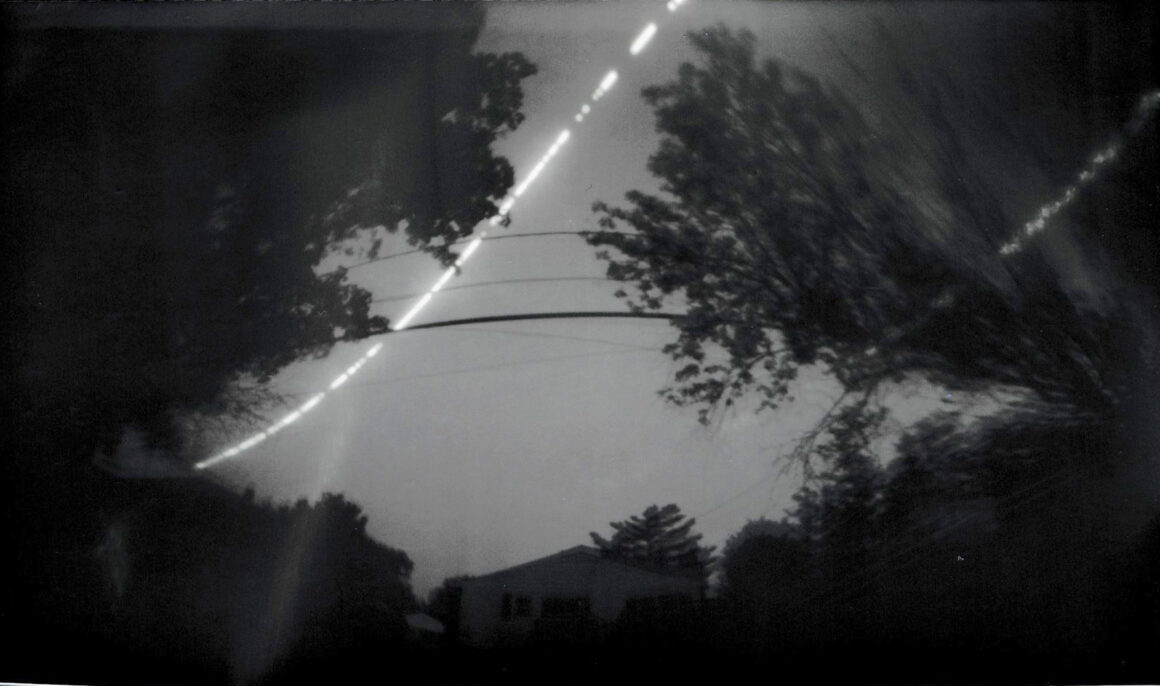
Solargraphy is a camera technique using basic pinhole cameras and photosensitive paper to capture the sun’s path over hours, days, or months. You don’t need lenses or a dark room to develop your images, just the sun, a soda can, and photo paper. These long exposures can range from 24 hours to even several months! My photo shown here was taken over 24 hours, from about 10pm to 10pm, to capture the sun streaking over my home.
This is an easy project that would be fun for photographers looking for something different to try, as well as kids and parents who are looking for projects to supplement art and science lessons. You can use SunCalc to find the directions and path of the sun in the places you’re planning to put your cameras (there is also a MoonCalc site too!).
Tips and Suggestions
- Aim your pinhole camera south in the Northern Hemisphere (or north in the Southern Hemisphere) for maximum sun arcs.
- Use SunCalc to determine optimal direction and angle.
- Make sure your can is weather-resistant, discreet, and secure, especially if you’re carrying out multi-month exposures.
- Six months gives you the full solar arc from summer to winter, but even just a few days show trails beautifully.
- Remove paper in a dark room and scan immediately. Invert in Photoshop or any editing software to create the final positive image.
- After scanning and securing your image, you can relight-proof the can for future use. Just replace the paper and any electrical tape where light leaks may have formed for your next exposure cycle.
Solargraphy Camera in a Can Tutorial: Frequently Asked Questions
What is solargraphy?
Solargraphy is a method of using a pinhole and photosensitive paper to record the sun’s path without development chemicals.
How long should I leave the solar camera outside?
From a single day to six months, or more! Each timeframe yields a unique sun arc.
What do I do with the exposed paper?
Scan it in a dark environment and invert the scan digitally to see your final image.
I don’t have Photoshop, is there another way to invert my photo?
If you don’t have Photoshop, no worries! You can easily invert your solargraphy scans using free tools like GIMP, Paint.NET (Windows), or online editors like Photopea. Simply upload your scan and use the invert color function to reveal your stunning solar trails. Details on how to use these other options to invert your photo are included in the instructions below.
Can I use a plastic container instead of a can for solargraphy?
Yes! While metal cans are ideal for solargraphy cameras because they block light and withstand weather, you can use a sturdy, opaque plastic container. Just make sure it’s light-tight and durable enough for long exposure solargraphy projects outdoors.
How do I attach the solargraphy camera to a post or fence for long exposures?
To secure your DIY solargraphy camera in a can, use strong tape, weather-resistant zip ties, or cable ties. Make sure the pinhole faces the sun’s path for the best long exposure sun tracking results, and firmly attach it to avoid movement during the multi-month exposure.
How long should I leave my solargraphy camera outside?
Exposure times vary depending on the desired effect. Leaving your solargraphy pinhole camera outside for a few days will capture brief sun trails, but exposures from three to six months reveal full seasonal sun arcs, creating dramatic and unique solargraphy images.
Can I reuse my solargraphy camera?
Absolutely! After developing your first image, reload the can with fresh photosensitive paper and reseal the pinhole until you’re ready to begin the long exposure. This allows you to create multiple solargraphy photo projects with the same camera body.
What’s the best location for a solargraphy camera?
Choose a spot with an unobstructed view of the sky along the sun’s path. The location should be free from shade for the duration of your solargraphy exposure to get clear and vivid sun trails. This helps capture the best long exposure solar photography results.
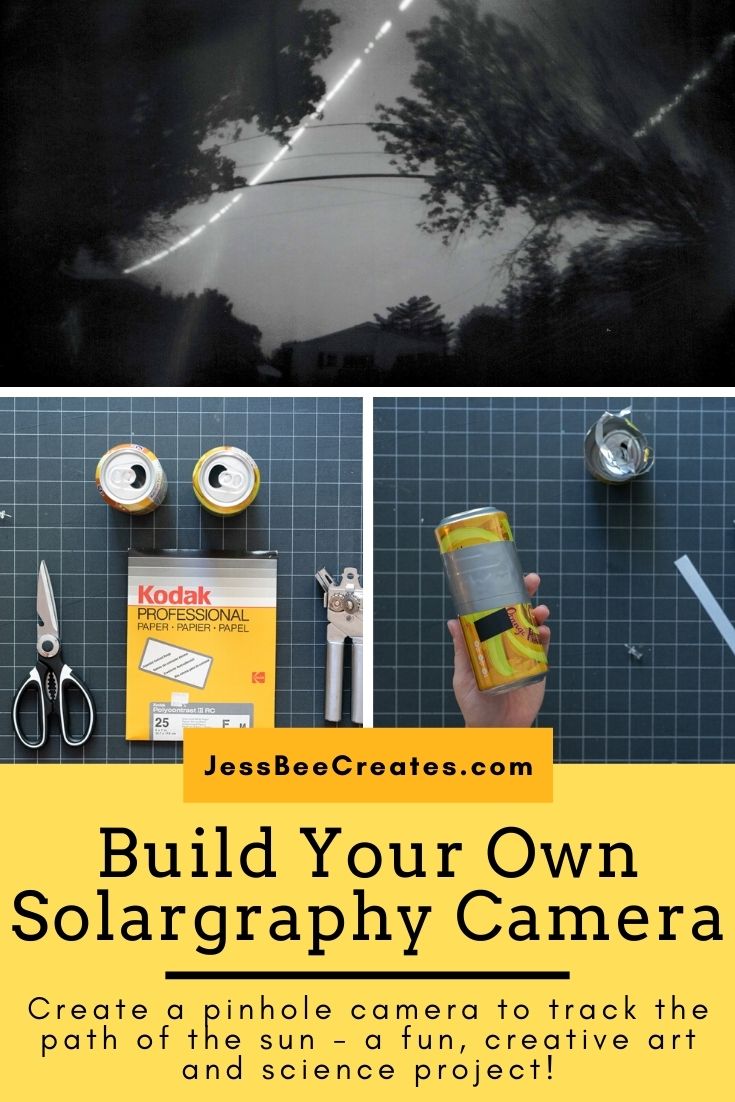
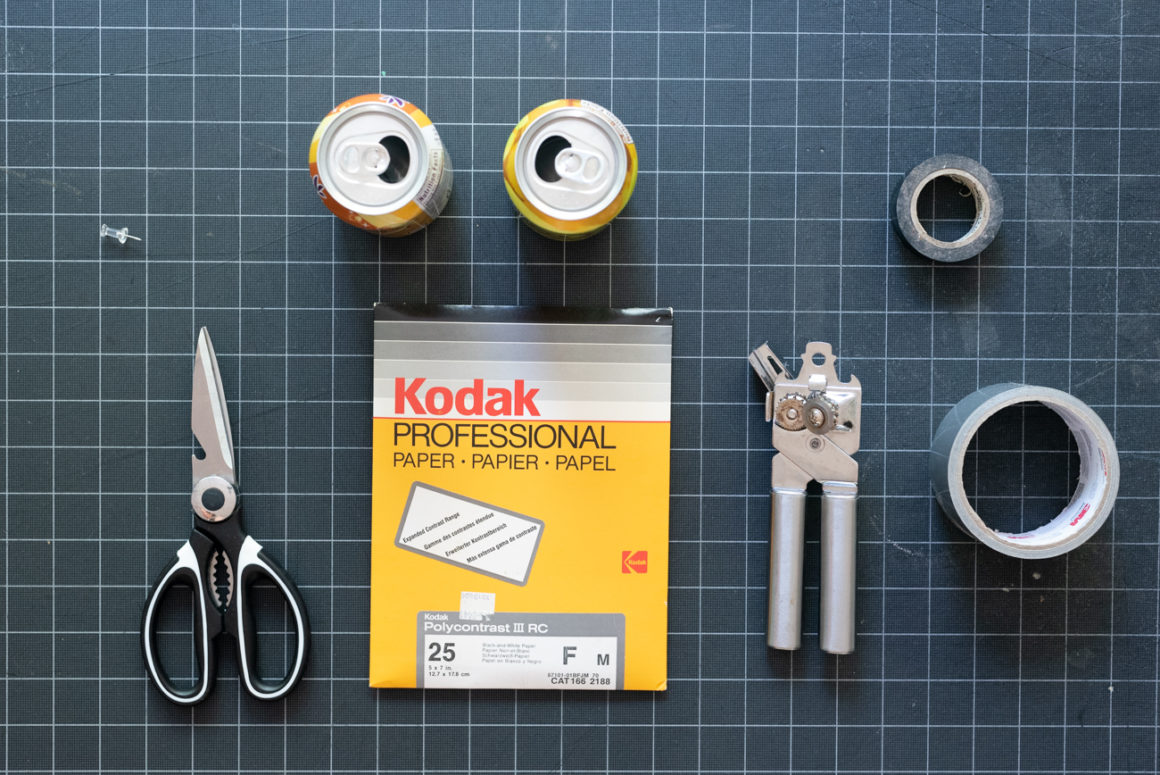
Gather Your Supplies
- Two soda cans
- Electrical tape
- Duct tape
- Sturdy scissors
- A can opener
- Photographic paper
- A tack or safety pin
- Red darkroom safelight (optional, but highly recommended)
Basic black and white photographic paper can be found for about $20 for 25 sheets. You do not use any chemicals and you do not process the paper like you would a typical print, so the paper is all you need. Be sure to keep the paper closed and in the light-proof bag inside the cardboard sleeve at all times, or your paper will be ruined!
Finally, please make sure your cameras do not become trash! Attach them securely in a non-destructive manner when they are placed, and make sure you retrieve them promptly.
Instructions
1. Gather your supplies.
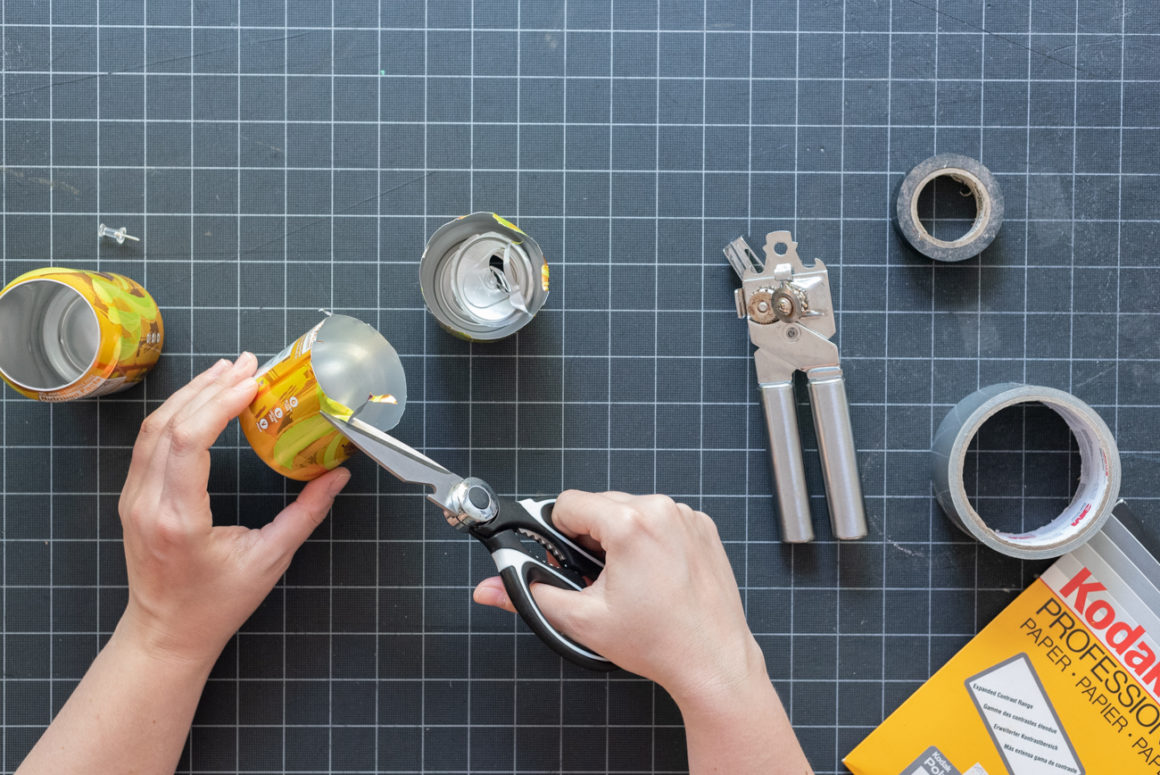
2. Carefully cut the top off of one of the soda cans. The can opener didn’t work in its usual method for me, but I was able to open and close it around the edges (as opposed to closing it once and using the handle to twist it around the top of the can) and it cut through it easily.
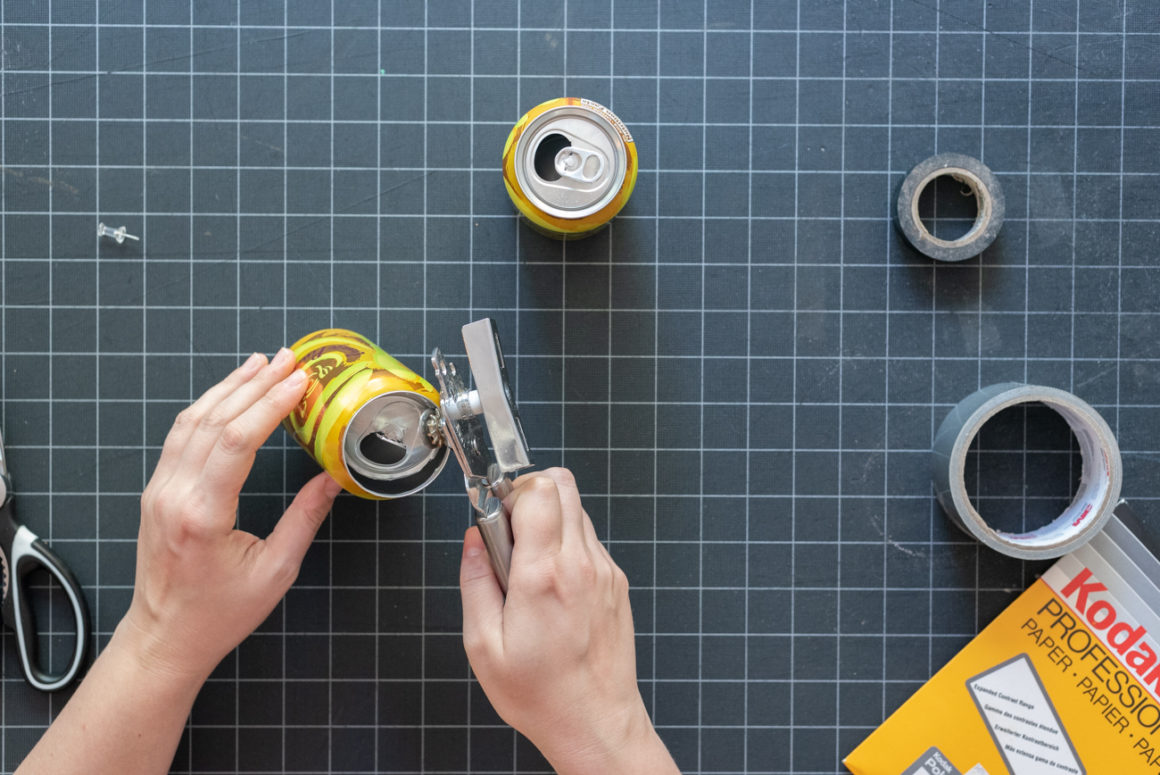
3. Watch out for sharp edges – use scissors or pliers to cut any hazardous bits off.
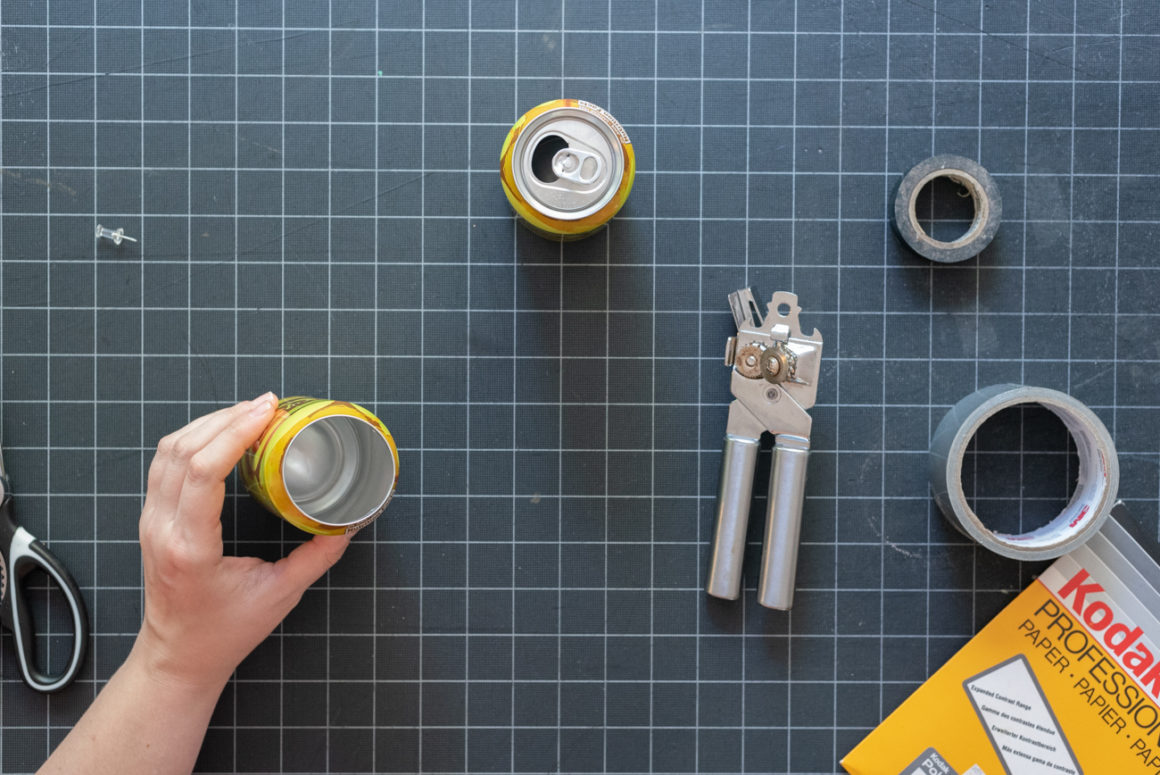
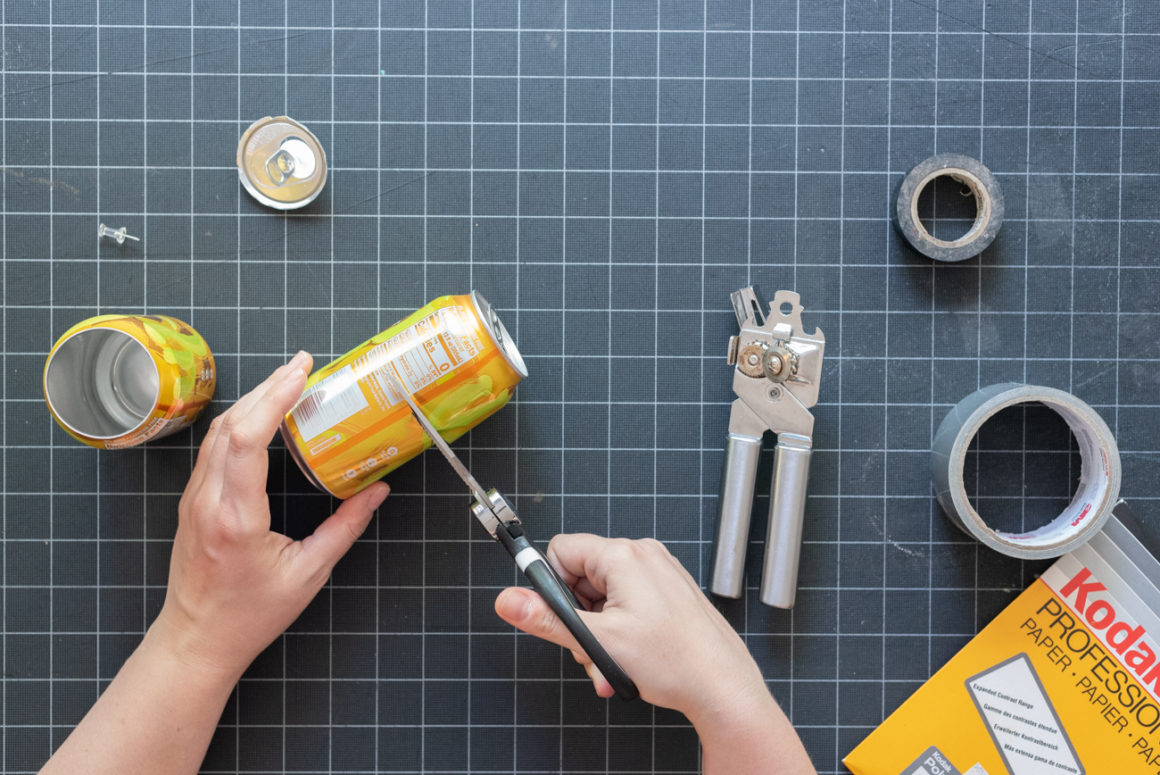
4. Cut the second can in half – the scissors will go through it easily – and trim around the edges to remove any jagged parts.
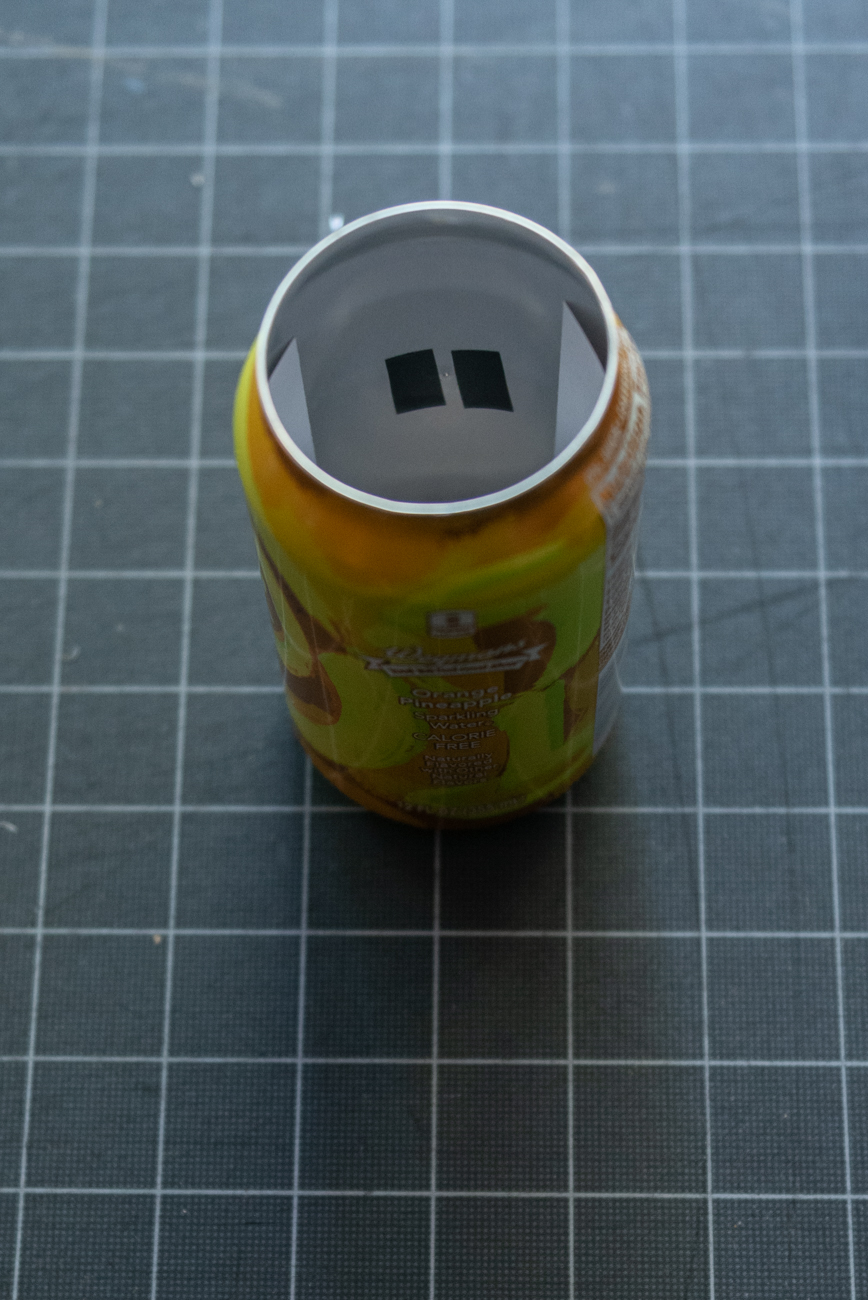
5. Use the tack to poke a tiny hole in the full-sized can. The hole should be just big enough to go all the way through the can. Do not push the tack fully into the can, or the hole will be too big. Just use the very tip of the tack to make the hole.
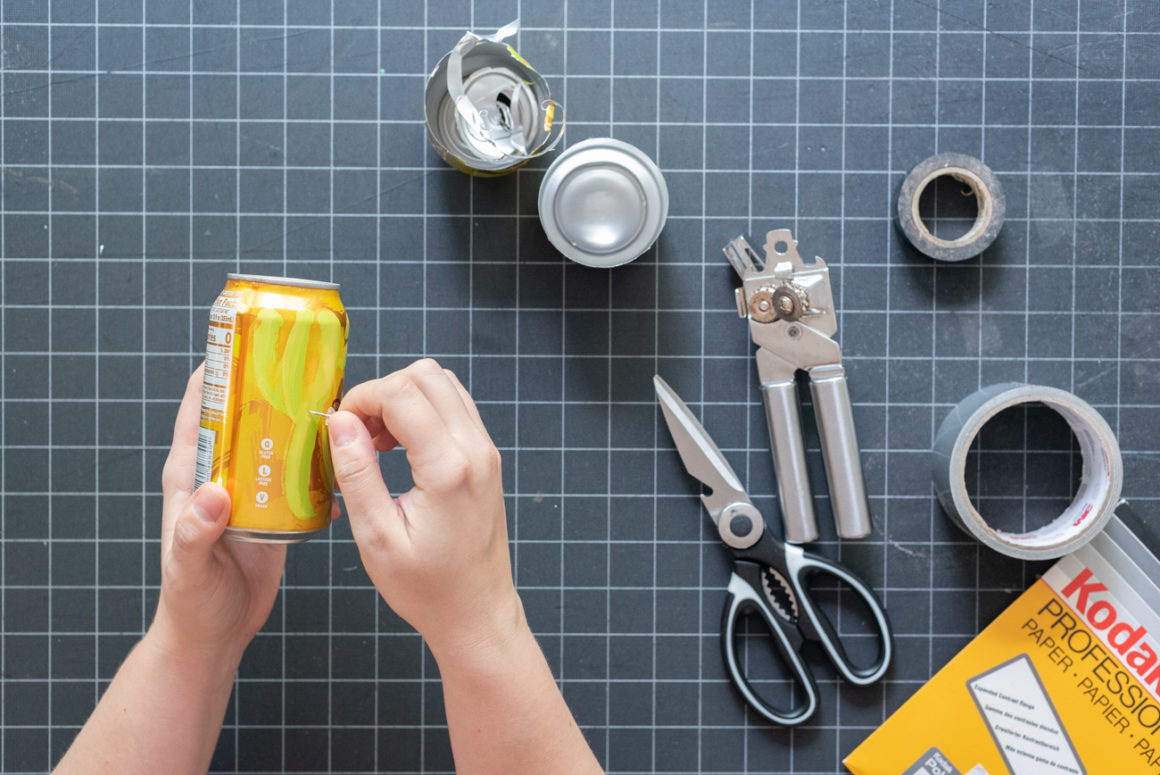
6. Using two thin pieces of electrical tape, mark inside the can on either side of the hole so you’ll be able to see it easily when you’re putting paper into the can. You don’t want the paper to block the hole. Test the size of the paper first by using an index card or sheet of paper inside the can first. You may have to trim the photo paper to fit.
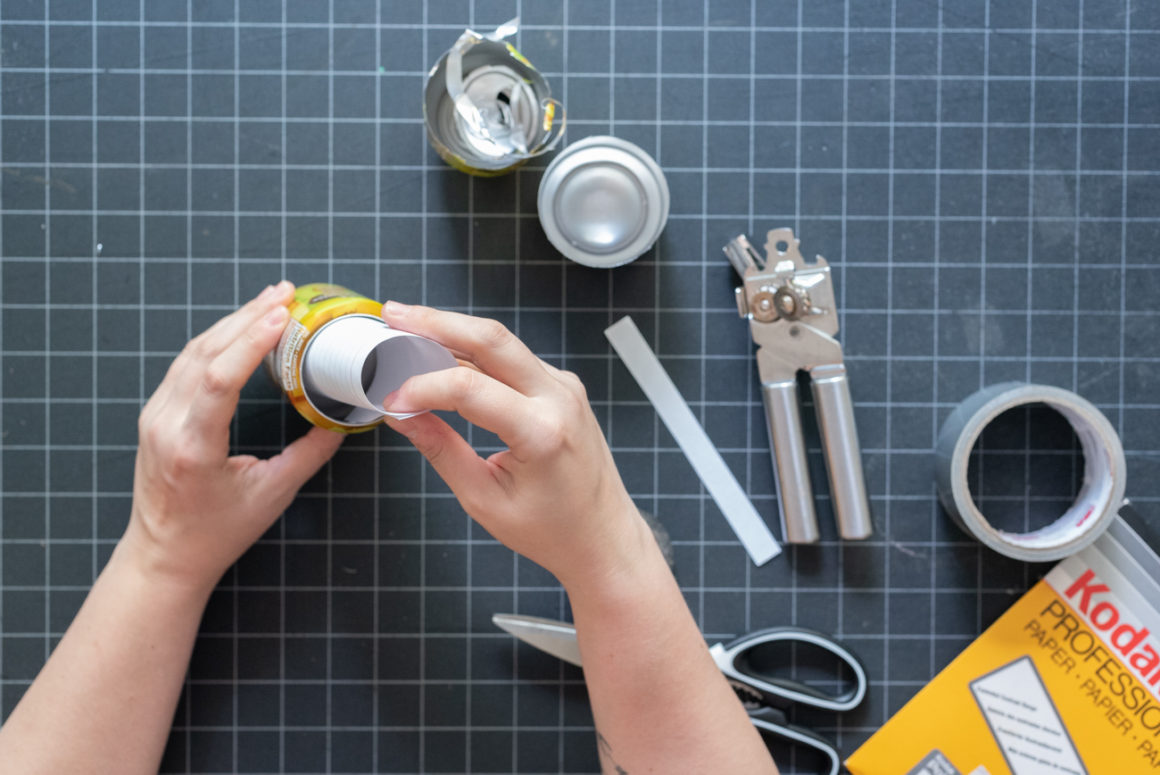
When you’re ready to put the photo paper into the can, begin by putting a piece of electrical tape over the hole on the outside of the can. In a dark room or near a small lamp with a red safelight in it, open the package of photo paper. Take a sheet out and put the rest away in the lightproof bag and envelope it came in. Use your test card/paper as a template to cut the photo paper to size, then gently roll/bend it to get through the mouth of the can. Using your tape guides, position the paper centered to and across from the hole you poked in the can. Make sure the shiny side of the paper is facing the hole/inside of the can.
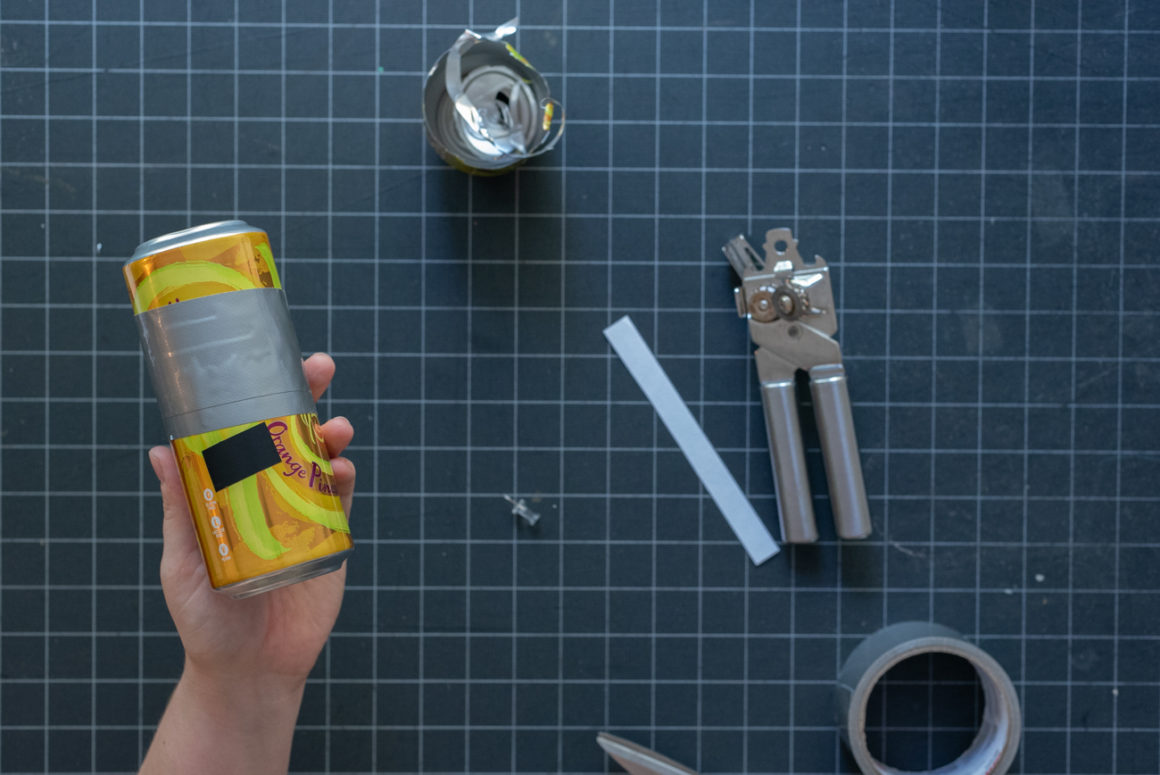
7. When you have the paper positioned inside the can, use the other can that you cut in half and place it on top of the full sized can like a lid. Use electrical tape to seal the seam between the cans.
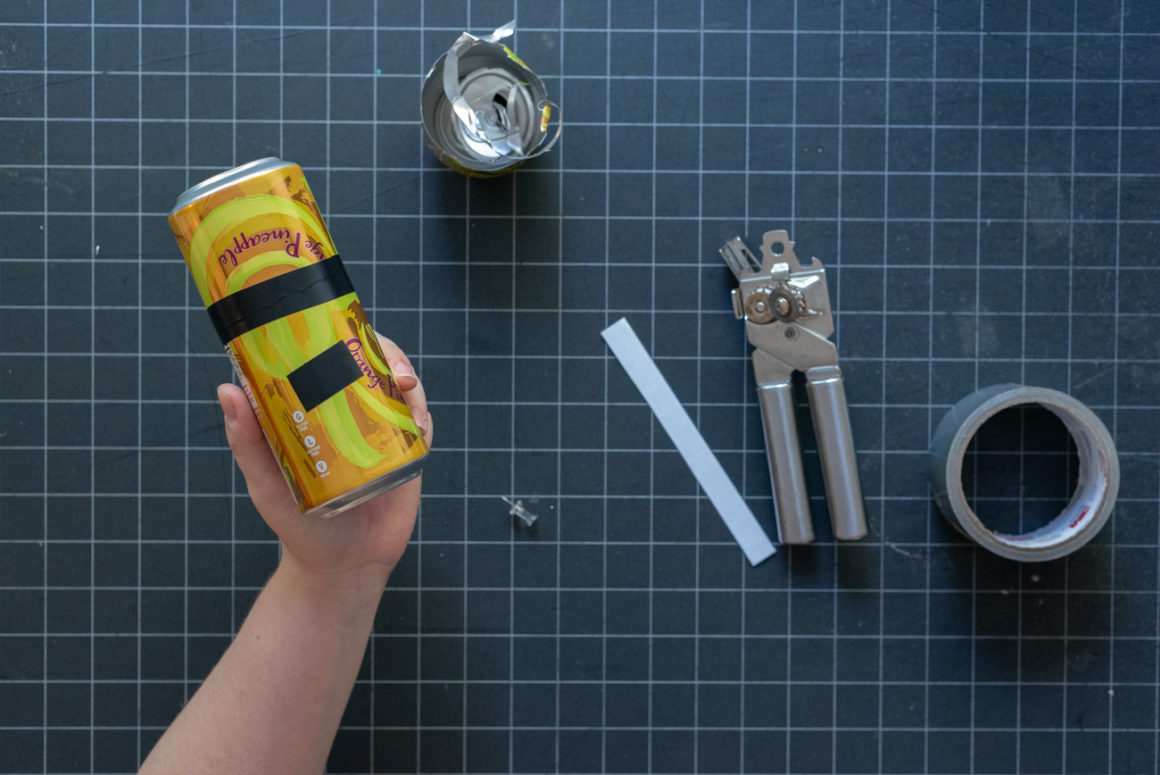
8. I added a layer of duct tape over my electrical tape seam just to be sure it stayed together well.
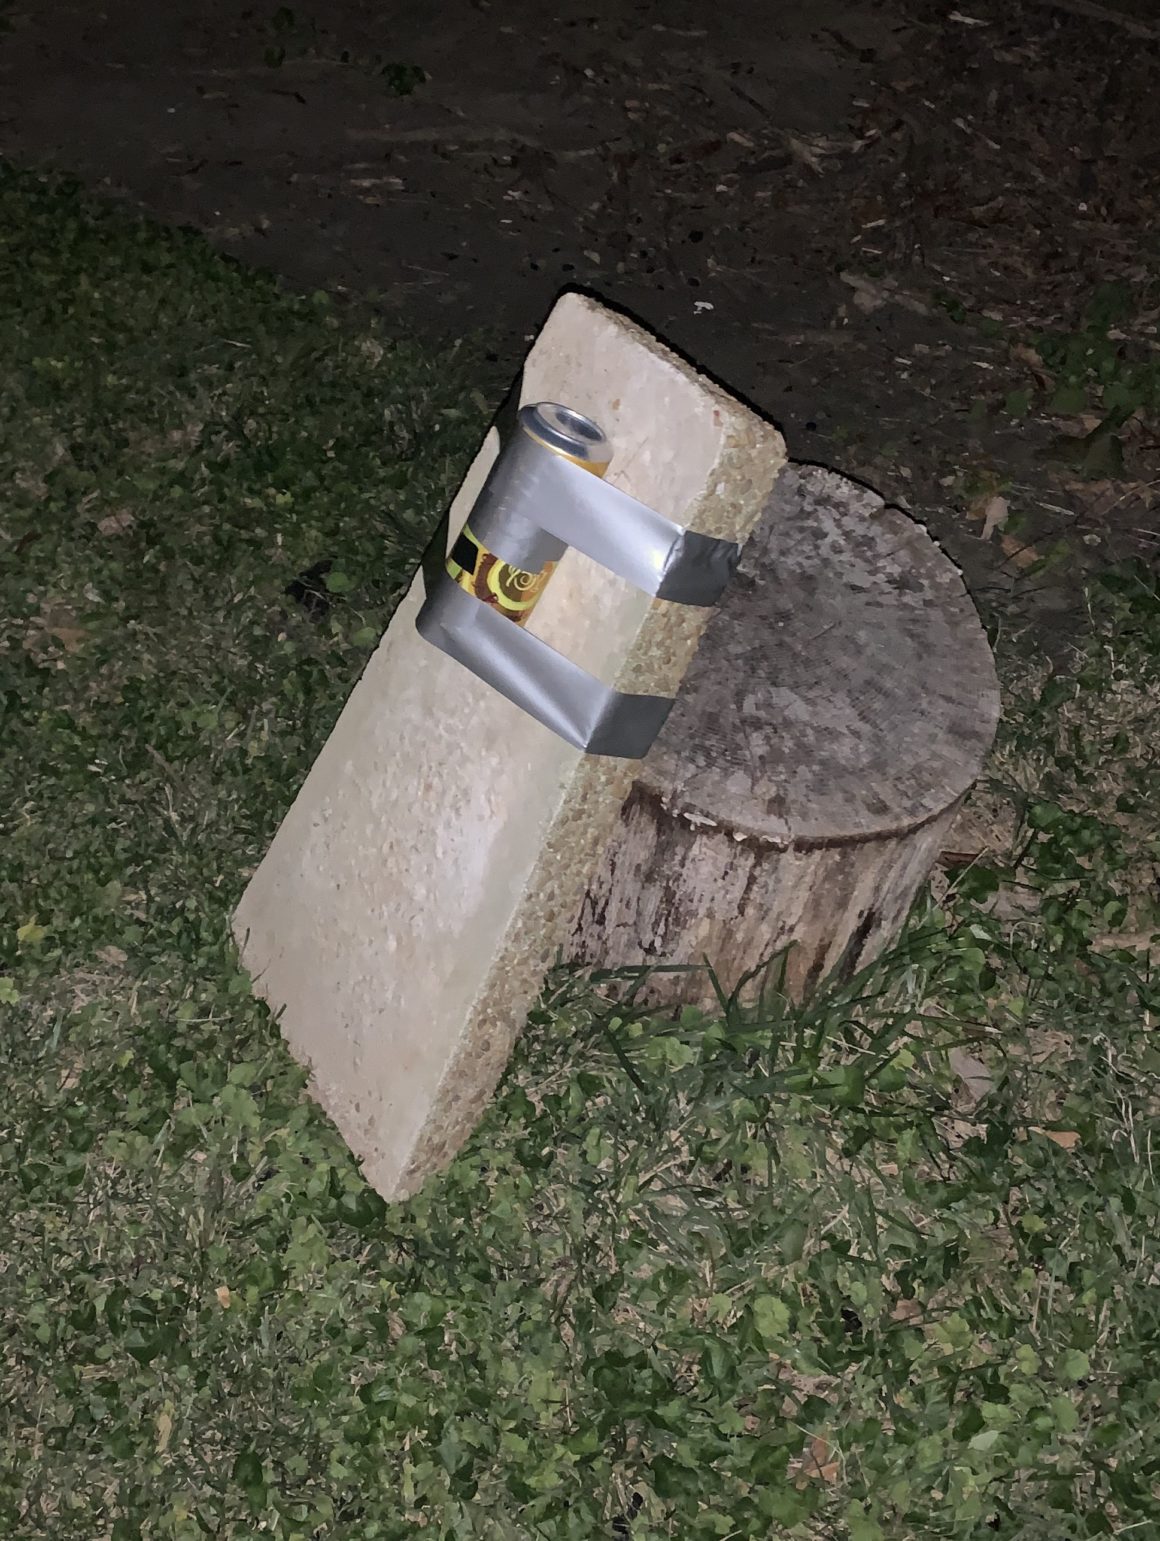
Now go forth and place your can-mra in a spot with an amazing view!
This is how I angled my camera at the edge of our back yard. It doesn’t need to be fancy, it just needs to be secure and pointed in the correct direction to catch the path of the sun (and possibly some trees or horizon if you want geographic context to your image).
9. After your photo has been exposed for the desired length of time, retrieve your camera and bring it to your computer. These photos should not be processed like regular prints – the negative image on the paper is your final image. Scan this photo, and then you’ll invert your scan to have a positive of your image. Keep the room dark, remove the tape from your camera, and then remove the photo paper inside. Scan the image and if you’re keeping the photo paper print, put it in an envelope and store it somewhere dark. I used Photoshop to invert my negative print into a positive image by selecting Image from the top menu bar, then Adjustments in the dropdown, and then Invert in the following menu. From here, you can adjust your image if desired.
- If using GIMP, open your scanned image → go to Colors > Invert → save the inverted image.
- If using Paint.NET, open your scanned image → select Adjustments > Invert Colors → save file.
- If using Photopea, upload your scan → Image > Adjustments > Invert → download.